Captain's Log 2 has a full navigation system.
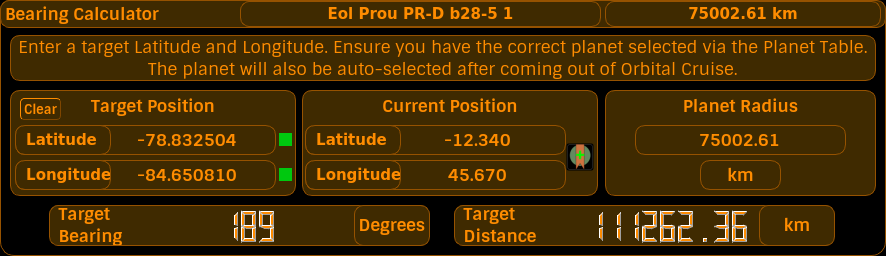
With the introduction from Elite: Dangerous 3.0 onwards, full navigation to a target Latitude and Longitude location on a planet surface is possible in real time, as the game now provides live update of your current Lat/Lon coordinates.
This is enabled by way of using the Bearing & Distance Panel. In conjunction with this is the Lat/Lon Bookmarks facility, which allows you to bookmark any number of Lat/Lon coordinates per landable planet, and add or edit a note per bookmark.
Also, the Captain's Log 2 Overlay will display a NAV panel any time Lat/Lon coordinates are provided by the game. When you have a Target Lat/Lon coordinate set, this NAV panel on the Overlay will guide you to your destination, which includes directional arrow indicators.
To enable full navigation to a set of coordinates on a planet's surface...
1) Select the correct planet you intend to fly to, from the Planets Panel
2) Enter a set of Destination Latitude and Longitude coordinates into the Latitude & Longitude entry boxes of the Target Position area as shown in the above screenshot. If the Lat/Lon coordinates entered are valid the indicator next to each will turn green.
3) Now fly to your destination planet!
Immediately upon current Latitude and Longitude coordinates of your ship become available, the Bearing & Distance Calculator will indicate the target's Bearing, which you should turn your ship towards, and the distance to your target coordinate.
Distance to your target coordinate is based on either your ship's altitude (i.e. if in Orbital Cruise or flying in your ship above a planet surface), or if you are driving in your SRV, your ground distance to target.
There's a Clear button which wipes the target Lat/Lon when you're done with a run.

Captain's Log 2 has an overlay, which provides a number of useful features.
NOTE: In order to use the Overlay, you must configure Elite: Dangerous to be in Windowed mode. The overlay will not appear if the game is in full screen graphics mode - this is because in fullscreen mode, the game takes complete control of the graphics card, overriding any other Windows applications.
To activate the Overlay Mode, click the Overlay checkbox at the top of the main Captain's Log 2 window.
If Elite: Dangerous is not running, the Overlay will not be shown, and the main window will show as normal.
The overlay displays once the game is running, and the main window will be hidden.
To recall the main window, press ALT-C - the main window will then be displayed.
The Overlay will automatically hide itself when the ship is docked at a starport. Once undocked, it will reappear.
It will also hide itself when you open the in-game Galaxy Map, and come back when you close it.
The Overlay can be dragged around the screen by way of clicking anywhere within the Overlay area - this is the dark area as shown in the above screenshot. The only exception to this is the Tgt Lat/Lon entry boxes.
1) General information section
This shows:
2) NAV Section

This shows:
The NAV section will only appear if current Latitude and Longitude coordinates are available to the ship - this is either whenever the Planetary Flight HUD appears on your ship, or when driving in an SRV.
3) Planet Information Section
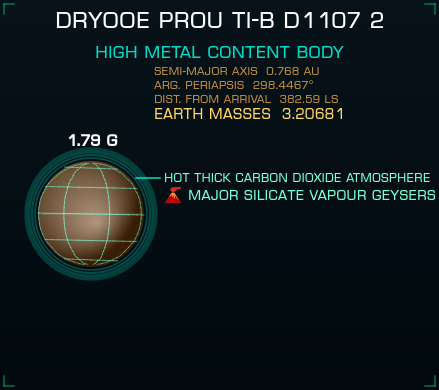
This is basically a cut down version of the main window Planet Table. It shows the information for the selected planet, and also has the % availability of materials on the planet, plus information on the Terraforming status, Volcanism type, or Atmosphere type of the planet, if there are any for that planet.
Rather than cram everything onto the one main overlay, a few of the overlays can run in their own separate windows - the NAV display, the BioTracker, and the Bio Tracker Map. You turn these on in the Configuration Manager's Overlays tab. Standalone overlay windows remember their position, so they pop back where you left them.
The planet data is also shown as a holographic wireframe widget, in the same style as the game's own FSS view:
The Lat/Lon Bookmarks Panel contains any and all bookmarked surface locations for a given planet. There is no limit to the amount of bookmarks you can add, per landable planet.
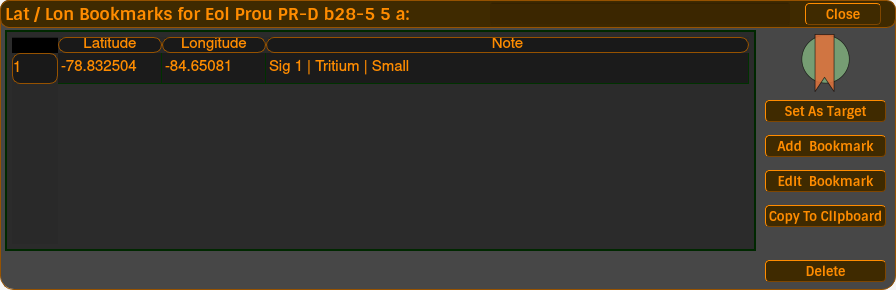
This Panel can be accessed either by clicking the Lat/Lon BM button in the main window Planets Panel, or by clicking on the lat/lon bookmarks icon which appears on the planet's row in the Planet Table, if there are Lat/Lon Bookmarks stored for that planet.
This can be achieved in a number of ways:
By clicking the Lat/Lon Bookmarks Icon with the green plus sign in it, which is next to the Current Lat/Lon indicators either on the Overlay, or on the Bearing & Distance Calculator Panel in the main window. A bookmark using the current Lat/Lon as shown on the Overlay or Bearing panel will be instantly created and added to the list of lat/lon bookmarks for that planet. A timestamp of when the bookmark was created will be added into the Note section of that instantly created bookmark.
By clicking on the Add Bookmark button in the Lat/Lon Bookmarks Panel. You will be presented with a Manually Add A Lat/Lon Bookmark panel. Enter the latitude and longitude you wish to store, and an optional note. Click Add to store the bookmark. A Timestamp will automatically be prepended to the note.
Highlight the lat/lon bookmark you wish to edit, and click Edit Bookmark. You will be presented with the Edit Lat/Lon Bookmark Panel. Click on Edit to store your changes, or Cancel to exit editing without saving.
Highlight the desired bookmarked lat/lon and click on Set As Target. This will input the stored Lat/Lon coordinates into the Bearing Widget. The Bearing widget will then be displayed, with the new coordinates.
Highlight the bookmark you wish to delete, and click on the Delete button.
Highlight the desired bookmarked lat/lon entry and click on Copy To Clipboard button. The bookmark will be converted to text and placed in the clipboard. You can then paste this text as per usual cut'n'paste operations to any other application or web site.
Finally, the Close button on the top right of the Lat/Lon Bookmarks Panel, will close this panel.
Update your browser to view this website correctly.