Support questions should be asked on the Captain's Log Discord server: https://discord.gg/F7CJDTM
Summary of Hotkeys
ALT-B : Toggle display of the Bookmarks Panel
ALT-C : Toggle the display of the main window if in Overlay mode
ALT-D : Toggle the display of the Set Target Destination Panel
ALT-E : Toggle the display of the EDSM Panel
How Captain's Log 2 Works...
The game generates what's called a Player Journal, which is a file containing various Events generated during the course of a player's actions within the game.
The Player Journal is usually located inside a user's Saved Games folder. Captain's Log 2 will try to automatically find this folder during its First Run configuration.
It is usually to be found in C:\users\<username>\Saved Games\Frontier Developments\Elite Dangerous
CL2 needs to know the correct location for the Player Journal files, otherwise it simply will not work.
Index
Click the links to the sections below. Use 'back' on your browser to jump back to this index...
1) Installation
2) Upgrading
3) First Time Run
4) The Captain's Log Main Window - a summary
5) Configuration Manager
-
5a) Databases
-
5b) Screenshots
- Filename Format Section
- Output Options
- Enabling or disabling Screenshot Monitor/Converter
-
5c) Imgur
- Configuring for your Imgur user account (Authorising CL2)
- Method 1 : Authorisation via the built-in web browser
- Method 2 : Alternative method (Imgur website and PIN)
- Queue Mode
- Enabling or Disabling Imgur Uploader
- Manually upload files to Imgur
- Uploaded Images Handler
- Configuring for your Imgur user account (Authorising CL2)
-
5d) Colour Customisation
-
5e) Miscellaneous (Check for updates)
6) The Main Window Interface Explained
-
Trip Jumps Table
-
Bookmarks
- Adding a bookmark
- Obtaining a list of all bookmarks
- Using the bookmark to jump to the row on the Jump Table
- Removing bookmarks
- Closing the bookmark panel
-
System Notes - Adding and Editing
-
Jump Notes - Adding and Editing
-
Info Panel
-
System Materials Panel
-
Stars Panel
-
Planets Panel
-
Navigation Feature
-
Bearing & Distance Panel
-
Overlay
- Activating the Overlay Mode
- Automatic overlay hiding
- Changing the position of the Overlay
- Sections of the Overlay
- General information section
- NAV section
- Planet information section
-
Latitude & Longitude Bookmarking System
- Adding a Lat/Lon Bookmark
- Editing a Lat/Lon Bookmark
- Setting a bookmarked Lat/Lon as a target
- Deleting a Lat/Lon Bookmark
- Copying a Lat/Lon Bookmark to the clipboard
-
7) The EDSM Panel
- Downloading the EDSM Nightly Dump to create a searchable database of millions of star systems and coordinates
8) Setting a Target Destination
9) Obtaining Scan Data For Known (Bubble) Systems By Way Of A Nav Beacon Scan
1) Installation
Download the installer and double-click. The default values are recommended.
2) Upgrading
It is recommended to:
- Back up your DB files before running the new version.
- Uninstall the previous version first.
3) First Time Run
If this is the first time Captain's Log has been run, you will be presented with a Configuration window.
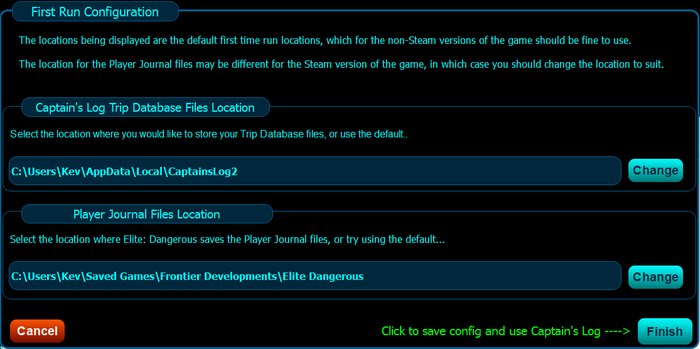
Captain's Log Trip Database Files Location
This is where your Trip databases will be stored. Click Change to bring up the directory selection dialog window.
The default is to the Captainslog2 directory located in your %LOCALAPPDATA% folder, and in most cases, this default location is fine.
Player Journal Files Location
This is the location to which the game generates its Player Journal files - these are the files which Captain's Log and other 3rd Party applications use in order to operate.
The default value should work, but if you know that this location is different for your particular installation, then click Change to bring up the directory selection dialog window.
Once the location has been selected, click on Finish.
You might be presented with an Update Available window. You can click on the URL shown in that window and it will open up the Captain's Log web site in your browser.
You will then be presented with the Captain's Log Main Window...
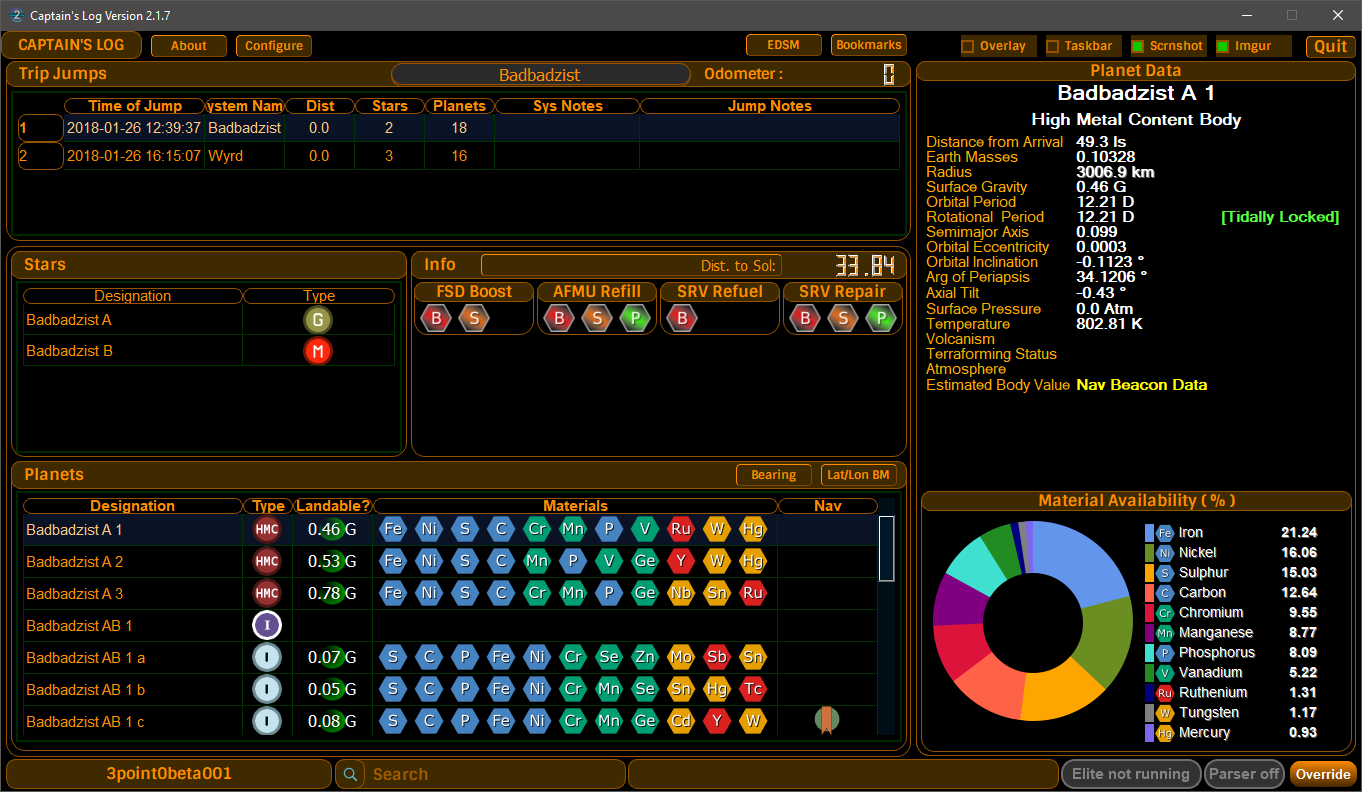
4) The Captain's Log Main Window - a summary
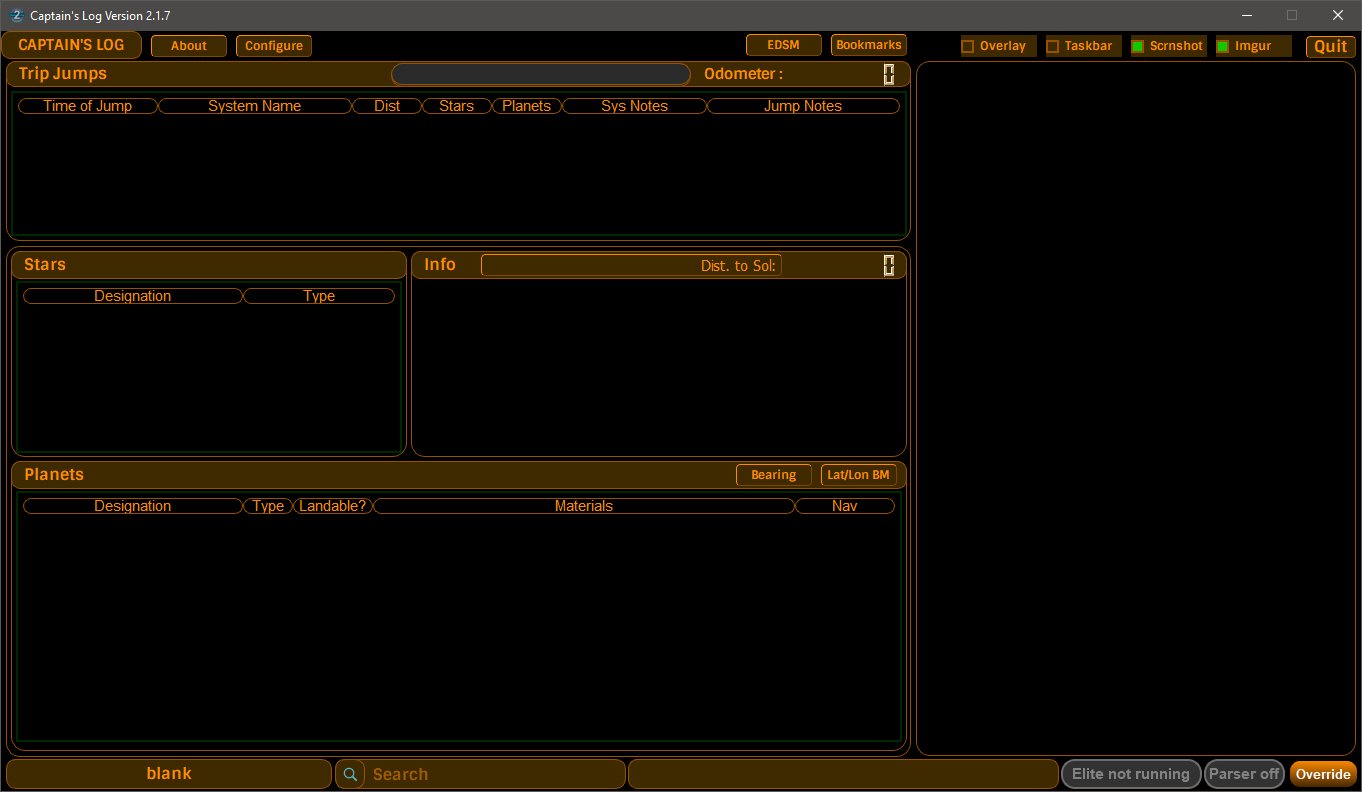
There are a number of buttons and checkboxes at the top of the main window.

- About : brings up the About information.
- Configure : displays the Configuration Manager
- EDSM : Will toggle the display of the EDSM panel
- Bookmarks : Will toggle the display of the Bookmarks panel
- Overlay : Will put CL2 into Overlay Mode once the game is running.
- Taskbar : disables the Windows Taskbar - upon exit of CL2 it will automatically re-enable the Windows Taskbar
- Scrnshot : Once checked, this will start CL2's Screenshot Monitor
- Imgur : Once checked, will start CL2's automatic screenshot uploads to Imgur - this needs some configuration to select either anonymous or Imgur user uploads.
There are also a number of panels...
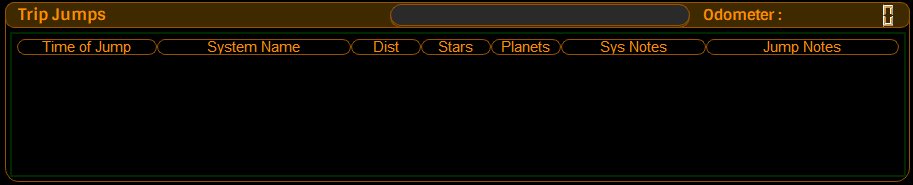
- Trip Jumps : Will display your jumps to each system, including the time of the jump, system name, a count of star and planets you scan, System Notes, and Jump Notes
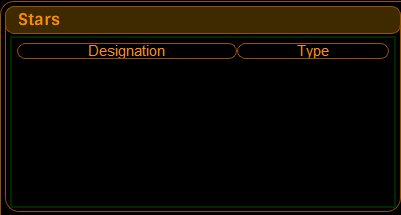
- Stars : Displays a list of stars in a system which you have scanned.
- Info : displays a number of useful pieces of information, such as if FSD Boost materials are available in this system, and/or if Auto Field Maintenance Unit (AFMU) materials are available in this system.
- Dist. to Button : this is a button which when pressed, calls up the Set Target Destination panel, which you use to select a target star system. After one has been selected, this button shows the Distance to a target star system, in lightyears.

- Dist. to Button : this is a button which when pressed, calls up the Set Target Destination panel, which you use to select a target star system. After one has been selected, this button shows the Distance to a target star system, in lightyears.
- Planets : displays a list of any planets in a system you have scanned
.
- Bearing button : Toggles the display of the Bearing Calculator

- Lat/Lon BM button : Toggles the display of the Latitude/Longitude Planetary Bookmarks panel

- Bearing button : Toggles the display of the Bearing Calculator
- There is also an Odometer, which keeps track of your accumulated FSD jump distance in lightyears.

On the right hand side, there is a large section, which is used for displaying more detailed information about stars, planets, and will be used for other things in future versions of Captain's Log.
At the botton of the main window, there are the following items...

- Trip database name : displays the name of the currently loaded and active trip database.
-
When Captain's Log is run for the first time, or if the currently configured trip database could not be found, Captain's Log will revert to creating and using a default database called v2default. You are able to (and advised to) create a new Trip database.
-
-
Search : Any text entered here will be used to search for matches in the Trip Database's System Name, System Notes, or Jump Notes. Results will be displayed in a table, from which you can jump to the relevant row in the Trip Jumps table.
-
The next item is a generic information label which displays messages such as detected screenshots.
-
Elite Running Indicator
-
Override Button : When clicked, this will put CL2 into a mode as if the game is running. This is useful if you are running Captain's Log on a different machine to which the game is running, and this involves a more complicated configuration which is only useful to more advanced users. Normally, you do not need to use this button, if you are running Captain's Log on the same machine that you are playing the game on.
5) Configuration Manager
When you click on the Configure button, the Configuration Manager will appear.
It has a number of tabs : 
- Trip Databases : Lists all your created Trip databases and performs a number of operations on those databases.
- Screenshots : To configure the Screenshot Detector/Converter/Renamer feature and to activate or deactivate it.
- Imgur : To configure uploads to Imgur, whether as an Anonymouse user or as your Imgur user, to activate or deactivate the feature.
- Colours : to customise the Captain's Log colour scheme.
- Directory Locations: to configure where to store Captain's Log's trip databases and also to configure the location of where the game sotres its Player Journal files.
- Updates : to configure whether or not Captain's Log checks for updates.
- Logger : At various times throughout the operation of Captain's Log, various internal functions will log messages to the Logger window.
Select your desired configuration area by clicking on the relevant tab.
5a) Databases
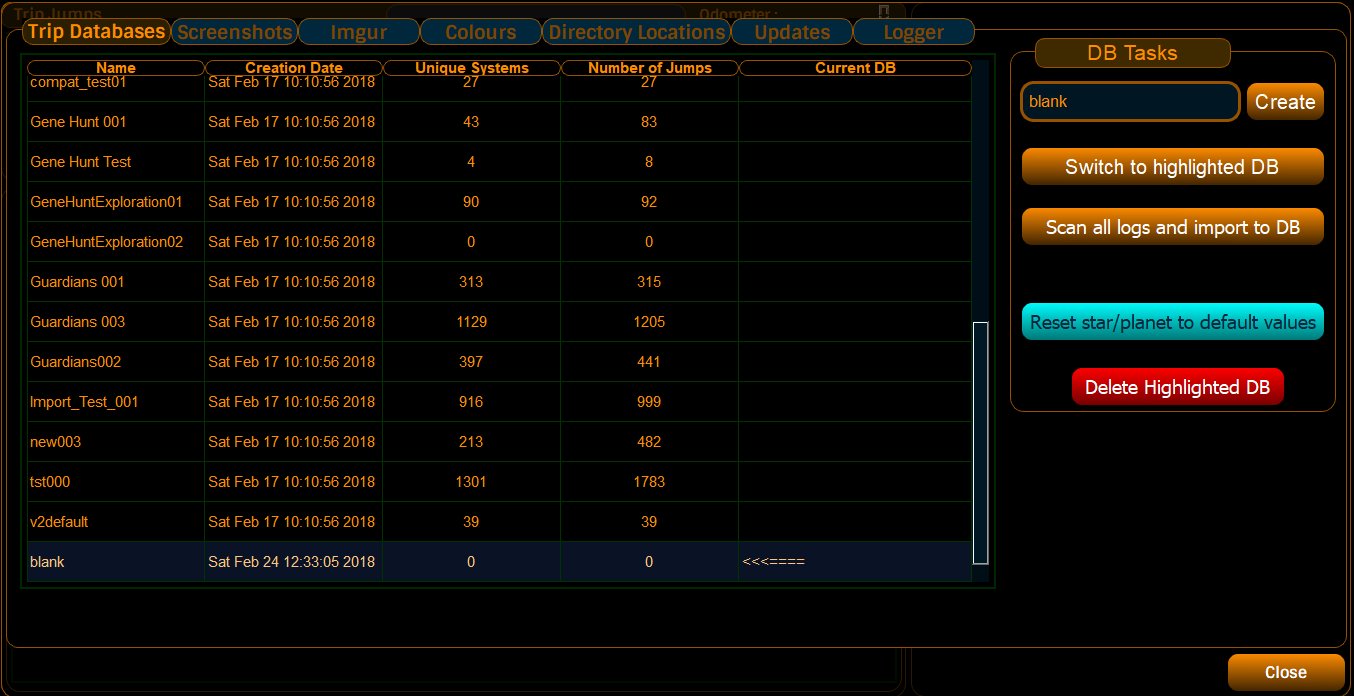
On the left is the list of all the trip databases created. If this is the first time CL2 has been run, there will only be the one, v2default trip database. If you do not create any more databases, all jumps will be recorded to this one.
To the right is the DB Tasks area.
Here, you can create a new trip database. Simply type in the name of your new database, and either press Enter, or click Create. You cannot create a new database with the same name as the existing one.
- Switch to highlighted DB : If you want to switch to a different database, highlight the name of the database you wish to switch to by clicking the relevant name, and click on the button. CL2 will then load that database, and any jumps recorded in it.

- Scan all logs and import to DB : This will attempt to scan any and all Player Journal logs generated by the game, and import any jumps, scans of planets and stars, rings, and materials resulting from scanning landable planets, into the CL2 database. Stars, Systems, Planets, Rings, and Materials all go into a special central database for use only by CL2, called GALAXY.db. Jumps go into the Trip Database and reference the GALAXY database for system names, planets, stars, body types, rings, materials etc.

Duplicate entries will not be created, so this is a safe operation. Although normally, you would scan and import to a blank trip database.
- Reset star/planet to default values : this is a special button added for existing users of CL2 prior to 2.0.0 Beta 7. For these users, this button will repair a few bugs in their existing central GALAXY.db database, which had duplicate entries for Ae/Be star types preventing CL2 from registering these after being scanned, and will also set the correct default high and low values for the different body types.
- Delete Highlighted DB : the Big Red Button :) ... does what it says, will remove an exisiting and highlighted database. It will NOT remove a loaded database.

5b) Screenshots
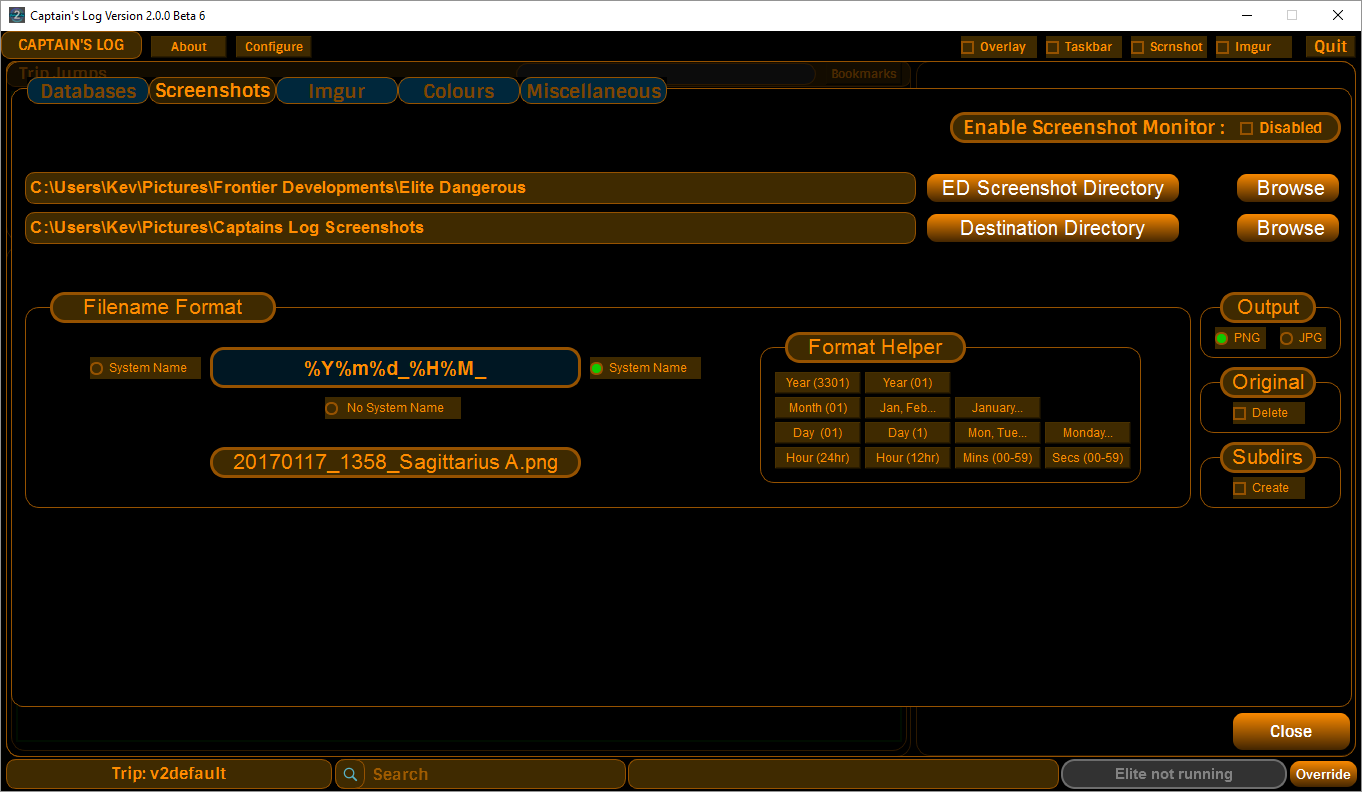
Captain Log's Screenshot Monitor is configured here.
Captain's Log can monitor the directory where the game saves its screenshots to. Screenshots are created by the game via pressing the F10 key in-game. Captain's Log does not take screenshots. The game saves its screenshots as BMP files, which is a picture format which results in a very large file size per picture, and if you take many screenshots, this can very quickly fill up your hard drive. Captain's Log can convert from BMP format to either PNG or JPG format.
Once CL2 has detected that there is a new sceenshot created, it reads that BMP image file in, and converts it to either of the two other formats. It then renames them to a format of your choice. A default naming scheme is already configured, which you can alter to your own tastes.
There are two directories to set up - the defaults should suffice.
- ED Screenshot Directory : Where the game saves its screenshots. The game saves screenshots as very large BMP format files. FOr most PC users, the default is where the game saves the screenshots (created by pressing F10 in-game).
- Destination Directory : Where Captain's Log will save the files it converts to either PNG or JPG format to. There is a default location automatically created and configured by Captain's Log.
- Note : If you reconfigure this save location, do not specify a location anywhere inside the ED Screenshot directory, as this will cause an infinite loop problem. Only specify a location outside the ED screenshot directory.
Filename Format Section
Here you can configure the filename you wish Captain's Log to save the converted screenshot as. There is a preview of the name below the format entry box.
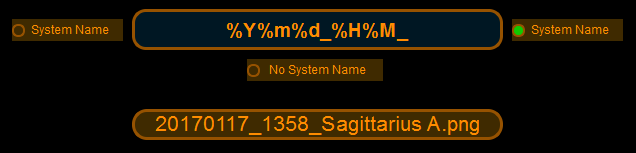
To change the format, use the entry box. You can completely remove all the existing format and start from scratch. There is a Format Helper box with pushbuttons you can click to assist you with the format...

The buttons are self explnatory; if you want the Year to be added into the filename, click once on which Year format you'd like. Same for the Month, Day, Hour, Minute, and Seconds.
You can also choose to prepend or append the system name - the system name is taken from the current system your ship is in, in the game. This will either be the last system name loaded into the Trip Jump table, or the last system you have jumped to in the game. You can alternatively choose not to add the system name. This is accomplished by activating one of the three radio buttons surrounding the format entry box.
Output Options
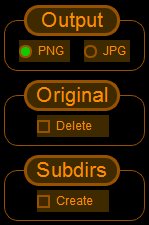
- Output : This is the converted output format. PNG or JPG. PNG format mostly preserves the colour and is higher quality than JPG. But JPG will produce a much smaller output file size.
- Original (Delete) : Select this to remove the original BMP file generated by the game after CL2 has converted the picture.
- Subdirs : Select this option to have Captain's Log create separate folders for the saved screenshots. This useful feature helps organise your converted screenshots. The folder names will be the current name of the system that Captain's Log assumes you are in, as described earlier.
Enabling or disabling the Screenshot Monitor/Converter

Simply check or uncheck. There is a corresponding indicator on the main window which you can also click to check or uncheck to enable or disable this feature.
All of these options are saved to a configuration file and will be recalled and set whenever CL2 is loaded.
5c) Imgur
NOTE: Imgur has a file size limit of 20 MB, therefore Captain's Log will not upload pictures larger than this limit. Also note that Imgur themselves will convert PNG files larger than 5MB to JPGs.
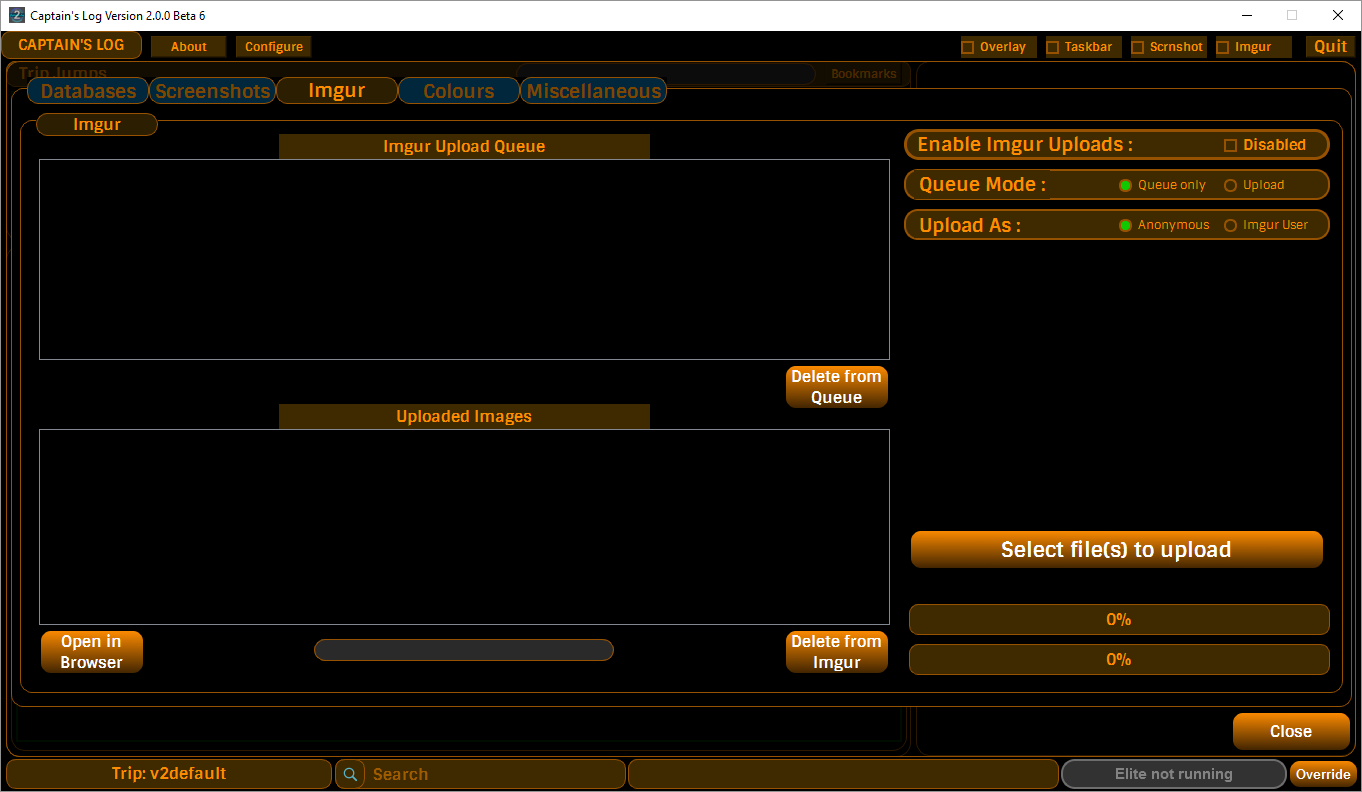
Captain's Log can automatically upload converted screenshots to Imgur. You can upload either as an Anonymous user, whereby the pictures will not be under your Imgur account and will be standalone links, or you can choose to upload them to your Imgur user account's area.
Configuring for your Imgur user account
Select Imgur User at the Upload As option...

If this is the first time you have run Captain's Log, or if for some reason your Imgur authorisation has been lost or become invalid, then a button will appear to bring up the authorisation page...
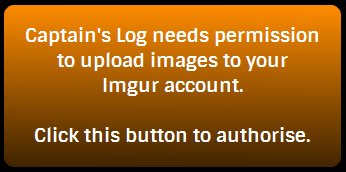
Click this button to begin the authorisation process. A new page will appear, showing on the left side a built-in web browser and the Imgur authorisation page for applications...
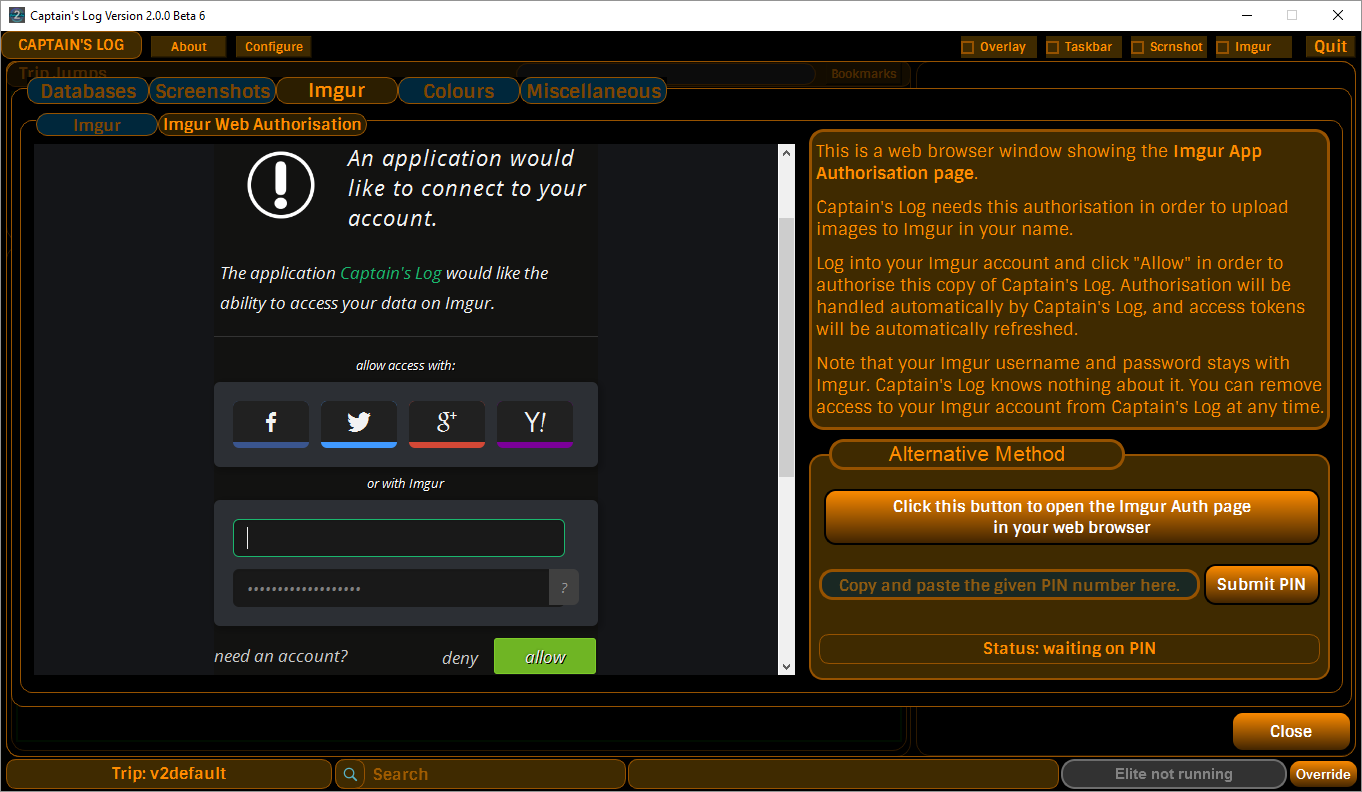
Method 1 : Authorisation Via The Built-In Web Browser
You can give your copy of Captain's Log authorisation by entering your user name and password into the provided web page and clicking allow. Captain's Log will wait for a reply from Imgur containing the authorisation keys, and will automatically store and use these keys for subsequent use. The keys are tied to this specific authorisation and your account. They do not allow Captain's Log to know about your Imgur username or password.
Method 2 : Alternative Method
If you don't trust Captain's Log's built-in web browser not to steal all your details, you can use this alternative method. Click the button in the Alternative method section as shown above. A new browser window will open on your PC. From there, Log into your Imgur account.
Imgur will give you a Pin number.
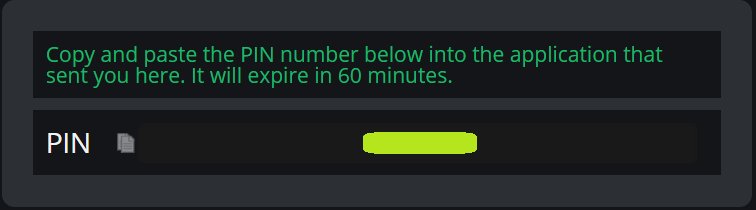
Paste that PIN number into the entrybox in the Alternate Method area and click on Submit PIN button. Captain's Log will save the authorisation for subsequent use for uploading to your user account on Imgur.
Queue Mode
There are two modes; Queue Only, or Upload

- Queue Only : Place all new screenshots in the Upload Queue and wait for further input from the user. You can manually remove pictures to upload from the queue
- Upload : Begin uploading a picture as soon as it has been added to the queue.
Enabling or Disabling Imgur Uploader
This is done by checking or unchecking the Enable Imgur Uploads checkbox. There is a corresponding Imgur checkbox at the top of the main window which you can use to enable or disable this feature

Manually upload files to Imgur
You can also manually add files to upload to Imgur by clicking on the button marked Select file(s) to upload. A file selection dialog window will appear, and you can select one or more picture files to upload.
Uploaded Images Handler
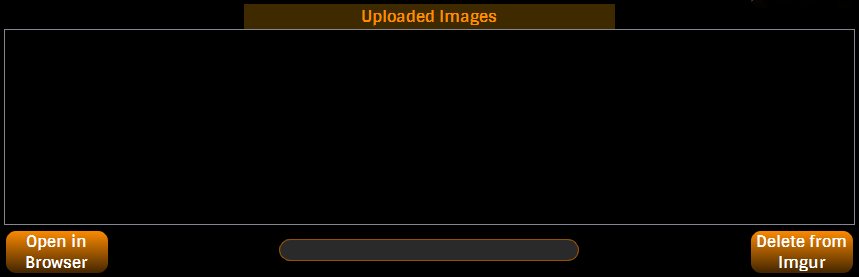
All successfully uploaded images will be listed in this area.
You can highlight a picture and the imgur link will be displayed on the Single-click-copy-to-clipboard widget at the bottom centre of this section. If you click on this, the link for that picture will be copied to your clipboard, and you can quickly paste that link to a web page or messaging forum.
You can also open that picture in your web browser by clicking the button called Open in Browser.
You can remove that picture from Imgur by clicking the button called Delete from Imgur.
5d) Colour Customisation
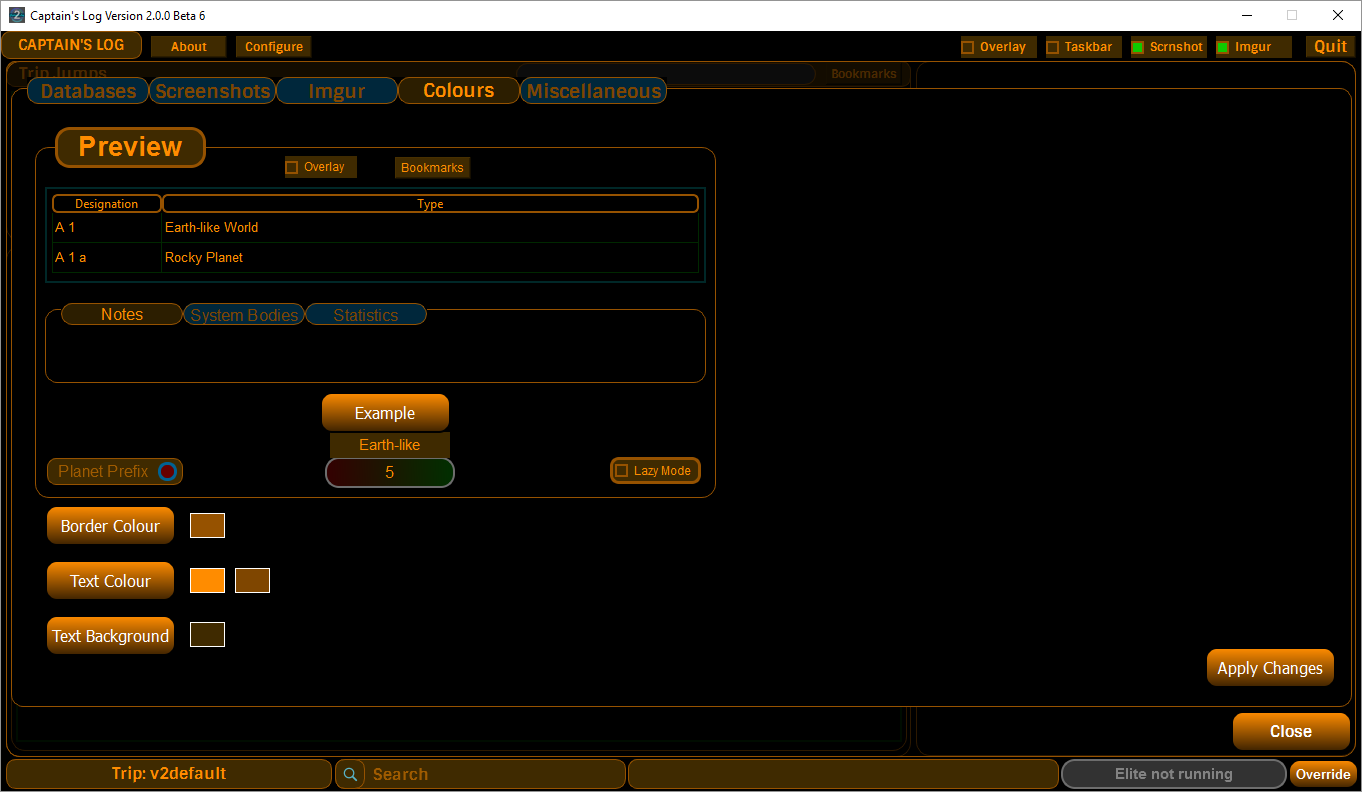
You can customise the colour scheme of Captain's Log.
Click on Border Colour, Text Colour, or Text Background buttons. This will bring up the colour selector widget on the right hand side. As you select a different colour, the Preview Window will show a preview of the colour changes on the various types of GUI widget used in Captain's Log, to give you a fair idea of how your changes will ultimately look.
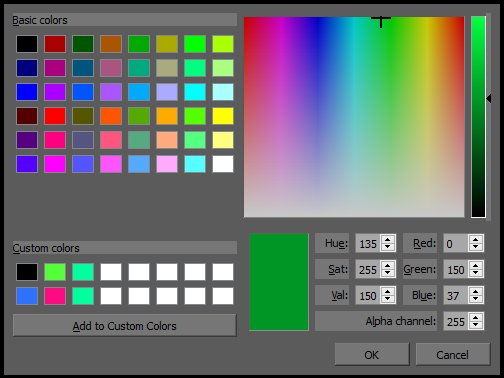
NOTE : You need to click on the OK button in the colour selector widget as shown above before you select a different Captain's Log colour to change.
After selecting your desired colour, remember to click OK on that colour selection dialog window.
When you are happy with your altered colour scheme, click on the Apply Changes button, which will apply the colour changes to the Captain's Log window, and also save this colour scheme for subsequent use.
You might find that tables don't properly change colour - in which case, simply exit Captain's Log and restart, which will properly change the table colour.
5e) Directory Locations
You can set the directory location of where to store CL2 DB's, and also manually set the location of where the game stores its Player Journal files, if that location is different from the default.
Changing the database locations now has an option for CL2 to relocate all the .db files from the current location to the new location.
This option is a checkbox which is ON by default and will read "Will relocate DB files to new location".
If you wish to NOT have CL2 relocate those files for you, clicking on the checkbox to deactivate the option and will read "Will not relocate DB files".
To change the DB location, click on the button marked Change
A Windows folder selection dialog window will appear. Create and/or select a folder to which you wish CL2 to keep and reference your DB files.
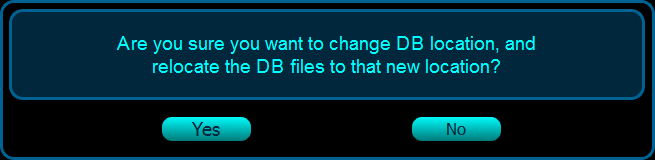
Once you have selected a folder, CL2 will ask if you are sure you wish to go ahead...
CL2 will provide feedback whilst it moves the DB files if you chose the default option to move them...

The EDSMStarData.db file will be rather big and will take a while to transfer to the new DB location.
After this task has been completed, CL2 needs to be restarted. A dialog window will appear...
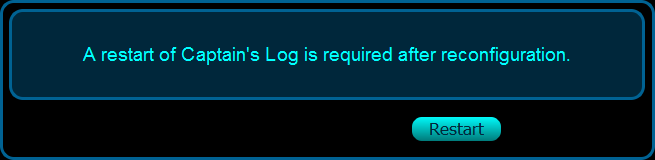
Click on Restart and CL2 will exit and restart, with the new configuration.
6) The Main Window Interface Explained
Once you start using Captain's Log, and as you start jumping around the galaxy, scanning stars and planets, the program begins to start displaying lots of useful information...
Trip Jumps Table
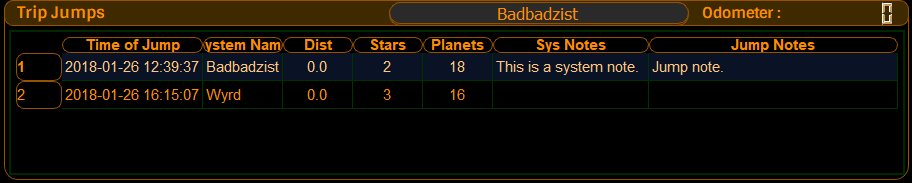
This section shows a record of your FSD jumps to systems. Time/Date, System Name, the distance you jumped in LY, A count of any stars you scanned, a count of any planets you scanned, System Notes, and Jump Notes.
Bookmarks
Bookmarks are a useful way of taking note of a certain system - maybe you found something really awesome at that particular jump/time and want to be able to quickly reference it.
To add a bookmark, select the desired row and double-click the Time Of Jump cell. That row will be added to your Bookmarks list. Additionally, a small popup dialog will appear and you can either enter a Bookmark Note or not - either way just press the Close button to remove this dialog...
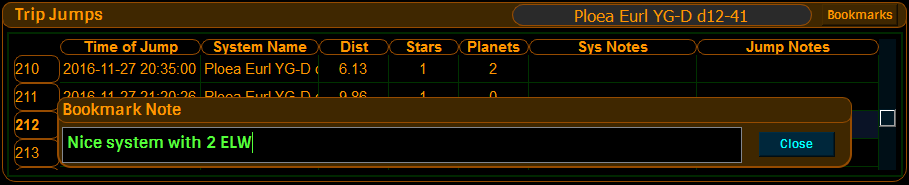
Once a jump has been bookmarked, it will show up as a different colour, in the Jump Table...

Bookmarks List
To retrieve a list of all your bookmarks, click on the Bookmarks button. A panel will appear with the list of bookmarks...
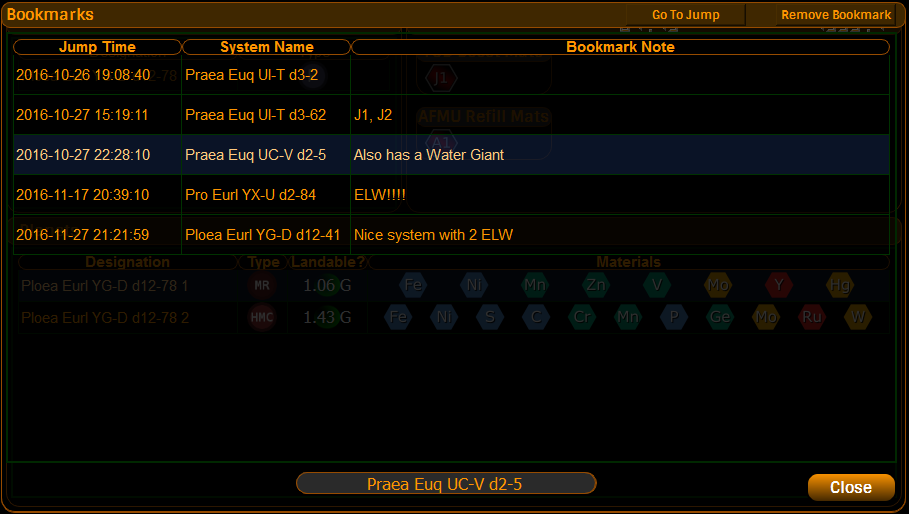
To go to a specific bookmarked jump on the Jump Table, highlight the relevant bookmark and click the Go To Jump button. The Bookmarks panel will close.
To remove a bookmark, highlight the relevant bookmark and click the Remove Bookmark button.
Another way of removing a bookmark without using this Bookmark Panel, is to double-click the Jump Time cell of the relevant row in the Jump Table (which you used to add the bookmark).
To close the Bookmarks Panel, click the Close button.
There is also a single-click-to-clipboard widget, which displays the system name of the currently selected bookmark - clicking on this causes it to flash, indicating it has copied the system name to your clipboard where you can paste the text somewhere.
System Notes
System Notes are unique to each system. make a system note for the Sol system, and this note will show up for every row in which the Sol system is displaying.
To make or edit a system note, simply double-click on the System Note cell of the relevant row of the jump table. An edit window will appear, and will display any existing note within it if one exists, or it will be blank, ready for you to enter text...
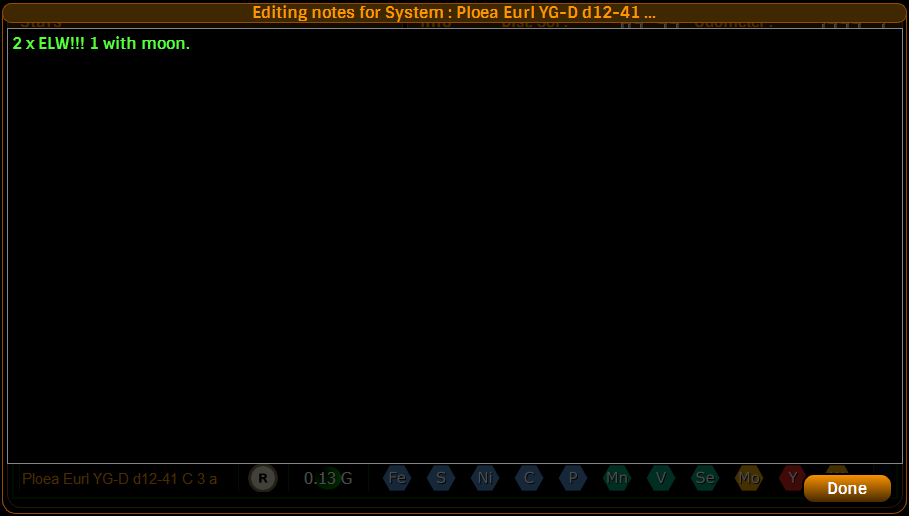
Once you have finished adding or editing your System Note, it will be saved when you press the Done button, and this window will be closed.
Jump Notes
Jump Notes are unique for each FSD Jump. Adding a Jump Note is exactly the same as for System Notes - double-click in the Jump Note cell of the relevant row of the table. And like the System Notes, an editing window will appear, where you can edit or add your notes. Again, clicking the Done button will close this window and save the Jump note to the database.
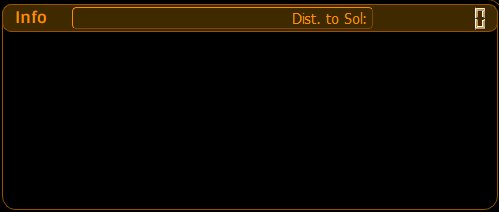
Info Panel
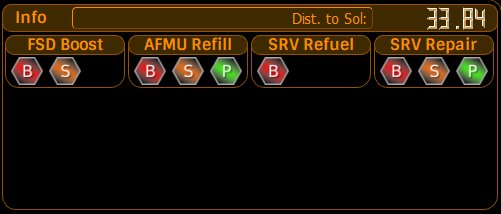
Currently, the Info Panel is used to display useful information such as;
-
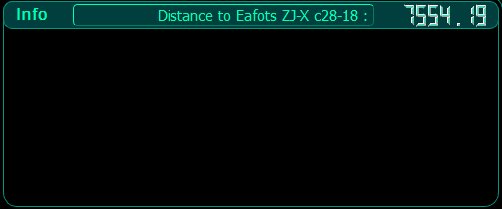
Distance to <target destination> : your current distance to target destination system relative to your current location in the galaxy. This is a pushbutton. To change your target destination, click this button and a Target Destination Panel will be displayed.
-
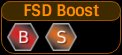
FSD Boost Materials : This indicates that in this one system, that you have scanned landable planets which have sufficient materials in order to collect various grades of FSD Boost Materials for Synthesis.
-
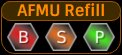
Auto Field Maintenance Unit (AFMU) refill Materials : This indicates that in this system, you have scanned landable planets which have sufficient materials in order to collect various grades of AFMU Refill for Synthesis.
-
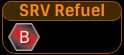
Surface Recon Vehicle Refuel Materials : This indicates that in this system, you have scanned landable planets which have materials available to collect for various grades of SRV Refuel synthesis.
-
Surface Recon Vehicle Repair Materials : Indicates you have scanned landable planets which have materials available to collect for various grades of SRV Repair synthesis.
If you have scanned landable planets and there are no suitable materials for those two types of Synthesis, these panels will not be displayed.
There are three grades of synthesis;
-
Basic : indicated by a
 icon
icon -
Standard : indicated by a
 icon
icon -
Premium : indicated by a
 icon
icon
These icons are clickable. When you click one, the large panel to the right of the main window switches to display the System Materials Panel.
System Materials Panel
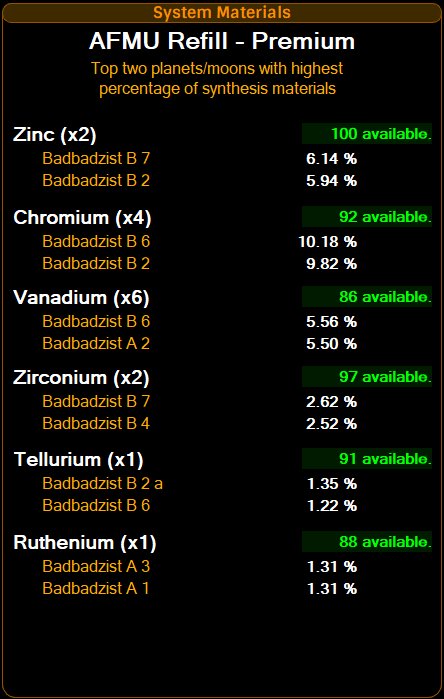
This panel appears when you click one of the  icons.
This panel tells you the first two planets in that star system with the highest % of the synthesis materials required for that particular grade of synthesis. In the example above, it is displaying the first two planets in BadBadzist with the highest % of materials available for the AFMU Refill Premium synthesis recipe.
The numbers in green show you how many of these materials you currently have.
Stars Panel
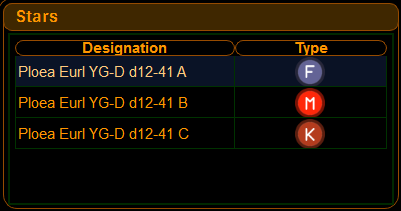
The Stars panel shows a table of the stars you have scanned in a system. Information displayed is Star Designation, and an icon for the star's Type
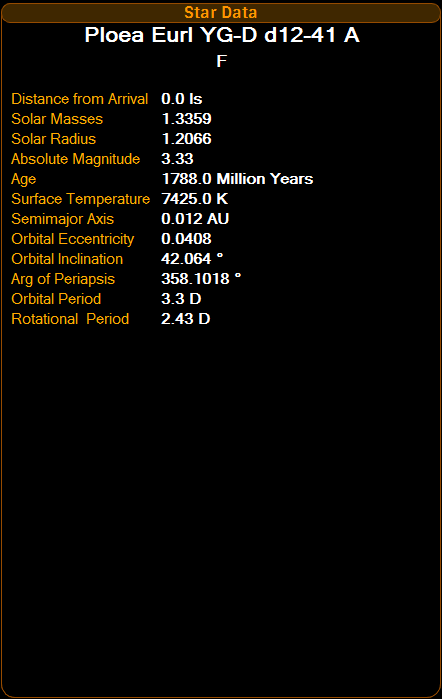
When you click on a Designation row, on the right hand side of the main window will be displayed a Star Information Panel, containing more detailed information about that selected star...
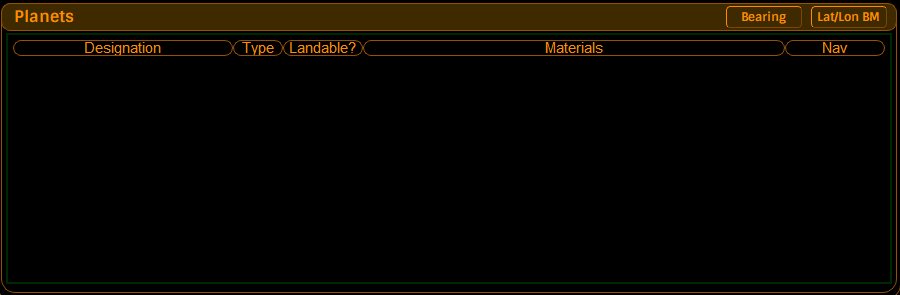
Planets Panel
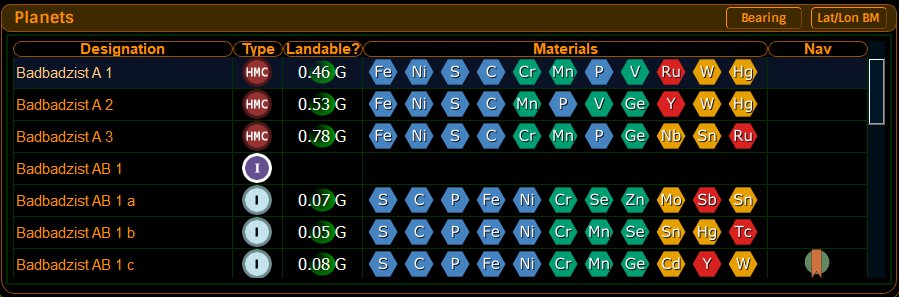
When you scan a planet/moon in a system, this table will become populated. It shows the body's Designation, Type. If it's a landable planet, this will be indicated, and showing the planet's Surface Gravity.

Landable planets always have a selection of Materials on them, which depends on the planet Type. Materials are shown as icons with the material's type shown as how they are known on the Periodic Table.

If you are unsure which material is which, move your mouse over that Material icon, and shortly thereafter a tooltip will display the name of the material in full.
When you click on a planet's Designation row, on the right hand side of the main window a Planet Information Panel is displayed, containing more detailed information about that planet...
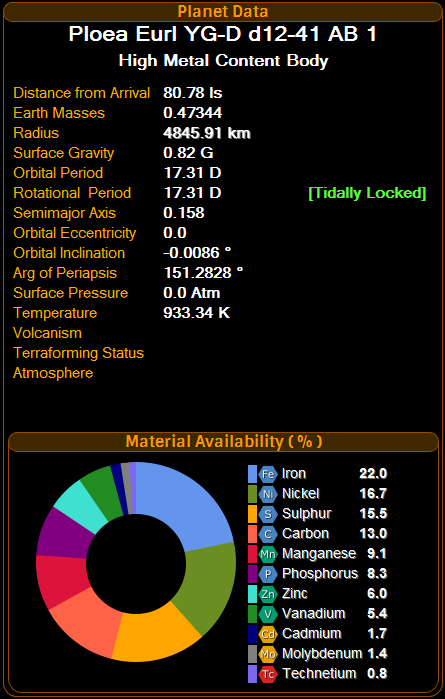
At the bottom of this panel is a donut chart which shows the percentage availability of each of the available materials.
Navigation Feature
Captain's Log 2, from version 2.1.7 onwards, has a full navigation system.
With the introduction from Elite: Dangerous 3.0 onwards, full navigation to a target Latitude and Longitude location on a planet surface is possible in real time, as the game now provides live update of your current Lat/Lon coordinates.
This is enabled by way of using the Bearing & DIstance Panel. Inconjunction with this is the Lat/Lon Bookmarks facility, which allows you to bookmark any number of Lat/Lon coordinates per landable planet, and add or edit a note per bookmark.
Also, the Captain's Log 2 Overlay will display a NAV panel any time Lat/Lon coordinates are provided by the game. When you have a Target Lat/Lon coordinate set, this NAV panel on the Overlay will guide you to your destination, which includes directional arrow indicators.
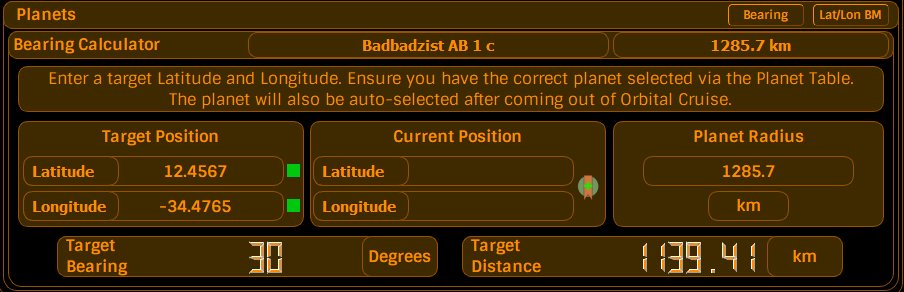
Bearing & Distance Calculator Panel
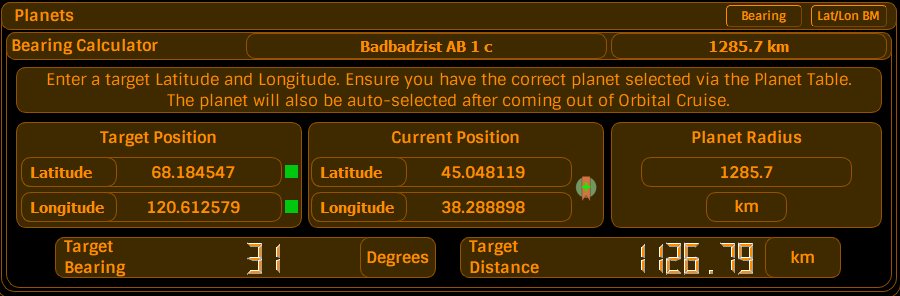
To enable full navigation to a set of coordinates on a planet's surface...
1) Select the correct planet you intend to fly to, from the Planets Panel
2) Enter a set of Destination Latitude and Longitude coordinates into the Latitude & Longitude entry boxes of the Target Position area as shown in the above screenshot. If the Lat/Lon coordinates entered are valid the indicator next to each will turn green.
3) Now fly to your destination planet!
Immediately upon current Latitude and Longitude coordinates of your ship become available, the Bearing & DIstance Calculator will indicate the target's Bearing, which you should turn your ship towards, and the distance to your target coordinate.
Distance to your target coordinate is based on either your ship's altitude (i.e. if in Orbital Cruise or flying in your ship above a planet surface), or if you are driving in your SRV, your ground distance to target.
Overlay
Captain's Log 2 has an overlay, which provides a number of useful features.

NOTE: In order to use the Overlay, you must configure Elite: Dangerous to be in Windowed mode. The overlay will not appear if the game is in full screen graphics mode - this is because in fullscreen mode, the game takes complete control of the graphics card, overriding any other Windows applications.
Activating the Overlay Mode
To activate the Overlay Mode, click the Overlay checkbox at the top of the main Captain's Log 2 window.
If Elite: Dangerous is not running, the Overlay will not be shown, and the main window will show as normal.
The overlay displays once the game is running, and the main window will be hidden.
To recall the main window, press ALT-C - the main window will then be displayed.
Automatic Overlay Hiding
The Overlay will automatically hide itself when the ship is docked at a starport.
Once undocked, it will reappear.
Changing The Position Of The Overlay
The Overlay can be dragged around the screen by way of clicking anywhere within the Overlay area - this is the dark area as shown in the above screenshot. The only exception to this is the Tgt Lat/Lon entry boxes.
The Sections Of The Overlay
1) General information section

This shows:
- The current star system you are in,
- The distance to your target star system,
- An estimated scan value of your scans of star and planets in the current system,
- Your Trip odoemeter
2) NAV Section.

This shows:
- The detected flight mode : Can be one of...
- Flight : denotes flight over a planet surface involving normal ship thrusters (i.e. not using FSD/Orbital Cruise
- Orbital : denotes Orbital Cruise or FSD flight near a planet surface before you enter Orbital Cruise and for which Lat/Lon coordinates are provided on the ship HUD
- SRV : denotes you are in an SRV
- Target Latitude and Longitude
- You can manually enter Lat and Lon coordinates from here
- Current Latitude and Longitude
- Instant Lat/Lon Bookmark Icon
- Clicking on this icon will create an instant Lat/Lon Bookmark entry for this planet, which includes the current Lat/Lon coordinates, plus the Date and Time of lat/lon bookmark creations is added to the Note section of that bookmark, which you can later edit.
- Directional Arrow Indicators
- When you have a Target Lat/Lon set, these arrows will indicate the direction you need to turn in, in order to get to the Target Bearing. If the central arrow is on, then you are facing the correct Bearing.
- Target Bearing
- The numerical representaion of the target bearing
- Target DIstance
- If you are in Flight or Orbital mode, the distance calculated takes your altitude into account as well as your distance around a sphere (Haversine distance plus Altitude)
- If you are Landed or in SRV mode, the distance calculated is the ground distance around a sphere (Haversine calculation)
The NAV section will only appear if current Latitude and Longitude coordinates are available to the ship - this is either whenever the Planetary Flight HUD appears on your ship, or when driving in an SRV.
3) Planet Information Section

This is basically a cut down version of the main window Planet Table. It shows the information for the selected planet, and also has the % availability of materials on the planet, plus information on the Terraforming status, Volcanism type, or Atmosphere type of the planet, if there are any for that planet.
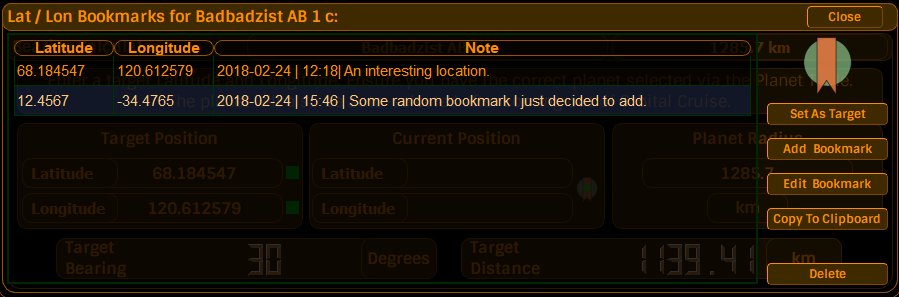
Latitude & Longitude Bookmarking System
The Lat/Lon Bookmarks Panel contains any and all bookmarked surface locations for a given planet. There is no limit to the amount of bookmarks you can add, per landable planet.
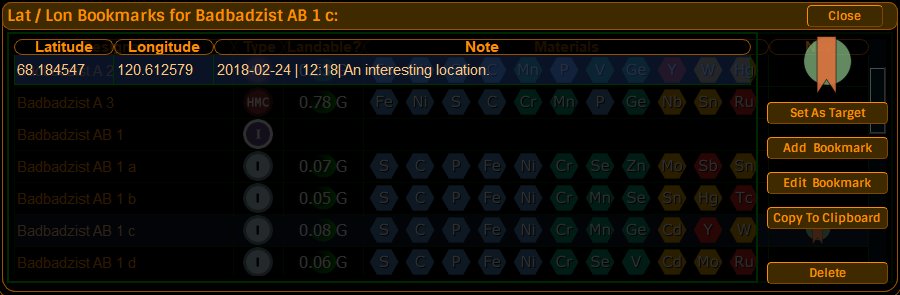
This Panel can be accessed either by clicking the Lat/Lon BM button in the main window Planets Panel, or by clicking on the lat/lon bookmarks icon which appears on the planet's row in the Planet Table, if there are Lat/Lon Bookmarks stored for that planet.
Adding A Lat/Lon Bookmark
This can be achieved in a number of ways..
- By clicking the Lat/Lon Bookmarks Icon with the greeen plus sign in it, which is next to the Current Lat/Lon indicators either on the Overlay, or on the Bearing & Distance Calculator Panel in the main window.
- If this method is chosen, a bookmark using the current Lat/Lon as shown on the Overlay or Bearing panel will be instantly created and added to the list of lat/lon bookmarks for that planet. A timestamp of when the bookmark was created will be added into the Note section of that instantly created bookmark.
- If this method is chosen, a bookmark using the current Lat/Lon as shown on the Overlay or Bearing panel will be instantly created and added to the list of lat/lon bookmarks for that planet. A timestamp of when the bookmark was created will be added into the Note section of that instantly created bookmark.
- By clicking on the Add Bookmark button in the Lat/Lon Bookmarks Panel
- If this method is chosen, you will be presented with a Manually Add A Lat/Lon Bookmark panel as shown...
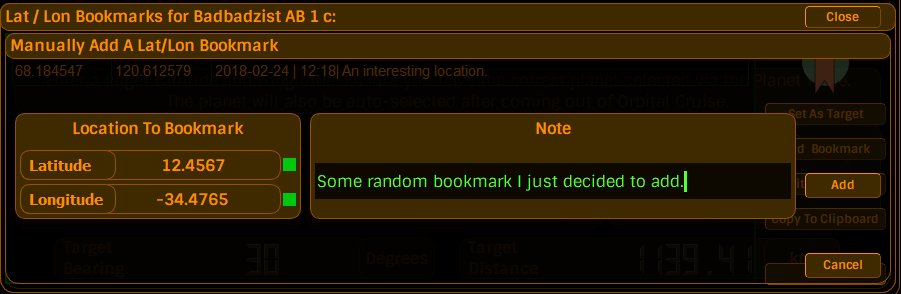
- Enter the latitude and longitude you wish to store, and an optional note. Click Add to store the bookmark. A Timestamp will automatically be prepended to the note...
Editing A Lat/Lon Bookmark
Highlight the lat/lon bookmark you wish to edit, and click Edit Bookmark. You will be presented with the Edit Lat/Lon Bookmark Panel...
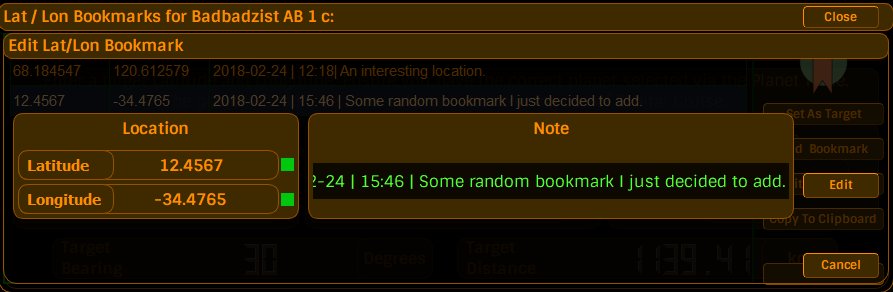
Click on Edit to store your changes, or Cancel to exit editing without saving.
Setting a bookmarked Lat/Lon as a target
Highlight the desired bookmarked lat/lon and click on Set As Target. This will input the stored Lat/Lon coordinates into the Bearing Widget. The Bearing widget will then be displayed, with the new coordinates...
Deleting a bookmarked Lat/Lon coordinate
Highlight the bookmark you wish to delete, and click on the Delete button
Copying a Lat/Lon Bookmark to the clipboard
Highlight the desired bookmarked lat/lon entry and click on Copy To Clipboard button. The bookmark will be converted to text and placed in the clipboard. You can then paste this text as per usual cut'n'paste operations to any other application or web site.
Finally, the Close button on the top right of the Lat/Lon Bookmarks Panel, will close this panel.
EDSM Panel

This panel adds the beginnings of EDSM support to Captain's Log.
At the moment, you can download EDSM's Nightly Dump. This is a very large file containing all the star systems and their coordinates, known to EDSM (submitted to EDSM by users of various other 3rd party tools).
From this, CL2 will import all these star systems and coordinates to a standalone EDSM.db database. This can then be used to search for star systems/coordinates when setting a Target Destination in CL2.
NOTE : The size of the EDSM Nightly Dump is quickly increasing every day. At time of writing, it is 814MB. The EDSM.db database created from this file is 520MB. Make sure that you have sufficient hard disk space to accomodate a download and an import.
To initiate a download and import a Nightly Dump from EDSM, simply click the pushbutton "Download and Import Nightly Dump of star systems + coordinates".

The download will begin. When this is done, CL2 will scan the file and count the number of star systems+coordinates within it...

After counting, CL2 will now import these systems+coords into a standalone database called EDSM.db ...

When all systems have been added - the additions to the EDSM database will be commited to the hard drive...

At this point, the download and import operation has been completed.
These operations are performed as background tasks, so you can click the close button of the EDSM Panel once you have initiated the download/import operation and continue to use Captain's Log 2 as normal.
Lastly, whilst the download/import operation is running, searching the EDSM database will be disabled, until this operation completes.
Setting a Target Destination
Setting a target destination allows you to see how far away you are in LY from your current galactic position to that target system.
To do this, click the pushbutton on the Info panel or press the keyboard shorcut of ALT-D. The Target Destination panel will be displayed...
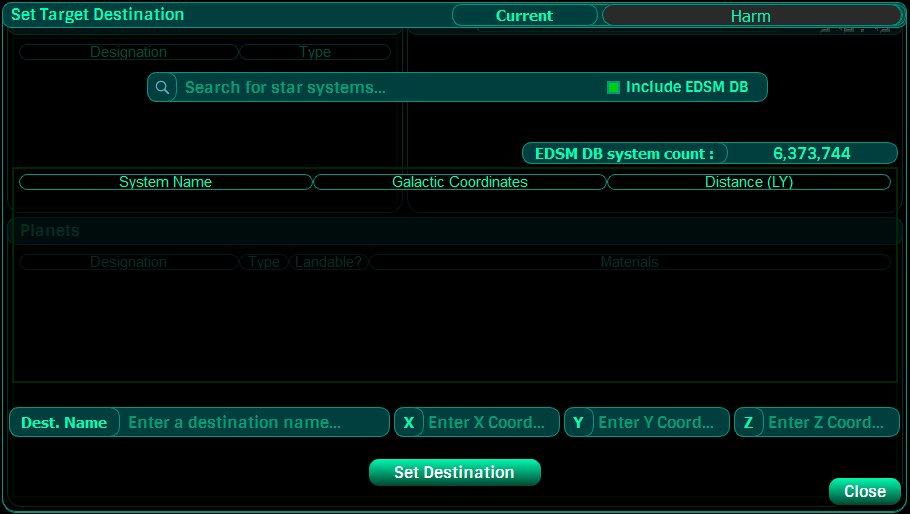
A) Manual destination input
You can type a destination name in the field marked "Dest. Name", then input Galactic Coordinates in the X, Y, and Z entry fields. Once done, you can click Set Destination. CL2 will then display that name and the distance to there on the main CL2 window and the Overlay widget.
B) Searching for star systems
Type a partial name of a star system (minimum of 3 characters), or a whole sector name, or a specific full system name, and press RETURN in order to start a search.
Captain's Log will search its own GALAXY.db database for this name or partial name and display the results in the table.
If you have previously downloaded and imported an EDSM Nightly Dump, then the checkbox called Include EDSM DB will be displayed (except whenever there is a EDSM Nightly Dump download and Import operation taking place in the background). To include searching in the EDSM database, make sure the box is checked before you initiate a search. CL2 will let you know that it is searching which databases.
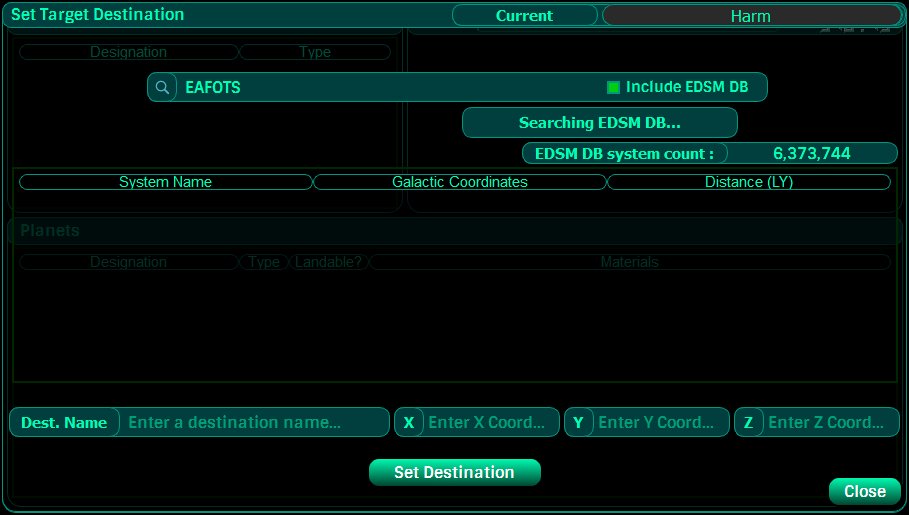
The time it takes to search depends on your search term and number of items matching the term
To pick a specific system name from the search results, click on that entry in the results table and then click Set Destination...
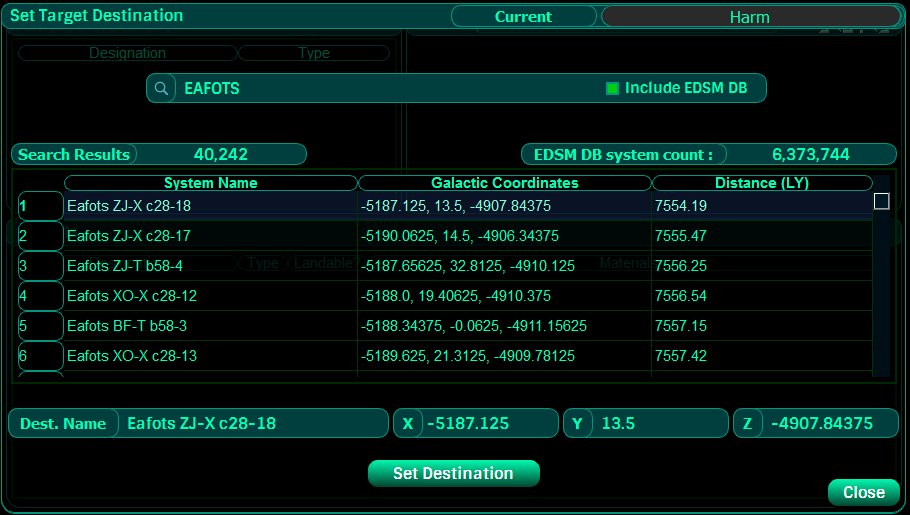
Captain's Log will then set that destination and will display it on the Info panel on the main window and on the Overlay...
Obtaining Scan Data For Known (Bubble) Systems By Way Of A Nav Beacon Scan
Captain's Log can obtain all the scan data for a known system.
i.e. Bubble systems for which your ship already has the scan data on stars and planets, and for which you can't re-scan the star or planet to get the data into Captain's log.
This is achieved by fitting a Detailed Surface Scanner, and visiting the system's Nav Beacon. Target the Nav Beacon and wait for the scan to complete.
Captain's Log will then obtain all the star and planet scan information for that system. This may take a while, depending on the amount of stars and planets in that system.